
The CRISPR-Cas9 system has revolutionized the field of genome engineering with limitless applications in disease therapeutics, drug discovery, agriculture, biofuels, and much more. This comprehensive guide addresses all the main steps in the CRISPR workflow to clearly explain how CRISPR technology works.
Once you have familiarized yourself with the basics of CRISPR, you will be ready to start your own CRISPR experiment. This might sound easy, but the path to becoming a genome engineer can be tricky. What is the best way to design your RNA guides? Which nuclease is appropriate for your experiment? Is one transfection method better than the other? How do you choose the best CRISPR analysis tool?
All these decisions can be overwhelming, but we are here to help. We'll introduce you to the core components used in most CRISPR experiments, walk through the overall experimental workflow from planning, designing your gRNAs, editing cells, and finally analyzing your results - learning about the key decisions researchers makes along the way. On the way, we will give you a few handy tips and warn you about potential pitfalls. As you move through each section, you can refer to our checklist for CRISPR experiments to keep track of your progress.
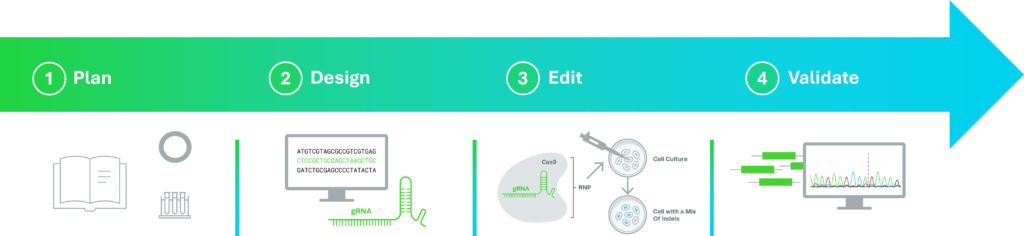
Every CRISPR experiment starts with a simple question: What do you want to accomplish? Your editing goal determines many of the decisions you'll make throughout the experiment, from the CRISPR system you choose to how you deliver it into your cells.
Thanks to the developments in the field of CRISPR, researchers are now not limited to just making precise cuts on genomes. Different genome editing enzymes can be fused with non-cutting Cas variants called dead Cas9s (dCas9), which allows us to edit individual bases, use CRISPR for diagnostics, or edit the epigenome.
Some of the most common editing goals are:
Not all guide RNAs are created the same. The way an sgRNA is produced can have a major impact on your experiment. Synthetic, IVT, and plasmid-derived sgRNAs each offer different advantages in terms of performance, reproducibility, convenience, and scalability. In our first chapter, we'll compare these options to help you choose the right sgRNA for your experiment and explain why many researchers are moving toward synthetic sgRNAs, especially as more projects advance toward the clinic.

After deciding what you want to edit, you'll need to choose the right CRISPR nuclease. When CRISPR first emerged as a genome editing tool, researchers only had access to naturally occurring nucleases. Since then, many engineered nucleases have been developed, giving researchers more options to match different experimental goals.
SpCas9, the first nuclease widely adopted for CRISPR editing, is still the go-to choice for many experiments. That said, newer engineered nucleases can offer significant advantages. For instance, Synthego's eSpOT-ON is a Cas9 variant engineered for higher on-target efficacy and reduced off target effects, while our hfCas12Max is an engineered Cas12 variant more compact than Cas9, improving its ability to be delivered via AAVs or LNPs. In our second chapter, we will cover how you can select the best Cas variant for your experiments.
Once you've selected a CRISPR nuclease, the next step is designing a guide RNA (gRNA). gRNA design begins by identifying a target sequence within your gene of interest that is compatible with your chosen nuclease. Each Cas protein recognizes a specific protospacer adjacent motif (PAM), which determines where guide RNAs can bind. Our third chapter will help you understand how PAM selection can help you target your genomic targets and avoid off-target cuts. Cas proteins, PAMs, and gRNA therefore go hand in hand, and we will cover all three in their chapters.
You made your first round of experimental decisions, and your nuclease and gRNA from Synthego just arrived at your lab. It is now time to edit your cells! Delivering CRISPR components to cells are known as transfection (or transduction when using viral vectors). There is no single delivery method that works for every experiment. In our fourth chapter, we will look at common methods for editing cells, such as lipid-based transfection, electroporation, nucleofection, viral vectors, and microinjection, and talk about their advantages and tradeoffs to help you pick the best one for your needs.
Once your cells are transfected, the final step of a CRISPR experiment is determining whether you have successfully edited their genomes. Analyzing your edits allows you to measure editing efficiency, confirm that the intended genetic changes occurred, and evaluate the quality of your results before moving on to downstream experiments. In our final chapter, we will review some of the tools available to you to validate your CRISPR edits.
The appropriate analysis method depends on your editing goal and the level of detail you need. For gene knock-ins, simple methods such as PCR or restriction enzyme digests can be used to detect the changes. However, gene knockouts are achieved by the insertion or deletion (indels) of random numbers of nucleotides, meaning that Sanger sequencing or next-generation sequencing (NGS) are commonly used to characterize these edits. Computational tools can simplify data interpretation such as Inference of CRISPR Edits (ICE) (first developed by Synthego, now hosted by our friends at EditCo).
Be it to cut or to insert, achieving your gene editing goals has one fundamental principle: start with high-quality reagents. Synthego is partner for all of your CRISPR needs; from high quality, ready-to-use synthetic research use sgRNA, different nucleases for every application, and PCR & RT enzymes to analyze your CRISPR edits.
Consistent and reliable reagents are key at unlocking the full potential and precision CRISPR offers. As your idea progresses from discovery to preclinical studies, and towards clinical trials, maintaining a continuity in your CRISPR reagents can simplify your journey, allowing you to generate more transferable data between stages, reducing the need for requalification. Synthego's CRISPR Continuum is designed to support that journey. Begin your research with our Research Grade sgRNAs for, then seamlessly transition to IND-enabling and GMP grade sgRNA, each designed to address the specific needs of a particular stage of your clinical pipeline. Along the way, our regulatory experts provide guidance to help streamline your path toward the clinic.
Check out our first chapter on the structure of single guide RNAs (sgRNAs) and the different types of sgRNA you can use in your experiments, helping you pick the best option for your experimental needs.
If you still have any questions after reading the guide, feel free to contact us to request more information and check out our other resources.
☐ Define your editing goal
☐ Choose the appropriate Cas protein
☐ Design your guide RNA(s)
☐ Plan your delivery strategy
☐ Validate your edits
Recombinase Polymerase Amplification (RPA) coupled with CRISPR-based detection offers a rapid, highly sensitive, and isothermal molecular diagnostic framework, bypassing the need for complex thermal cyclers. Operating at a constant 37°C...
Advancing a CRISPR program becomes more complex at every stage.
Cell-free protein expression (CFPE) systems enable rapid prototyping of protein constructs by expressing genes directly from engineered DNA templates in vitro. While linear templates allow fast iteration, circular DNA templates...
 Cart
Cart
 Account
 Your Orders
 Sign Out
 Sign In